The Dawn’s Descent Campaign Mission in Warhammer 40k: Space Marine 2 represents the sixth and final chapter of the game, featuring an epic confrontation between the Ultramarines and the Chaos forces. In this exciting quest, players take on the role of Lieutenant Titus following his encounter with Imurah at the Astropathic Relay during the fifth Voidsong Campaign.
Here’s how to successfully complete the Dawn’s Descent Campaign Mission in Warhammer 40k: Space Marine 2.
The sixth and concluding campaign mission in Warhammer 40k: Space Marine 2 includes multiple objectives. Below is a breakdown:
- Converse with the Chaplain
- Proceed to the Launch Bay
- Board the Thunderhawk Gunship
- Fight your Way to the Enemy Vessel
- Clear the Passage
- Advance to the Cathedral
- Hold Until the Battle Barge Has Target Lock
- Advance to the Mechanicus Facility
- Investigate the Dig Site
- Explore the Ruins
- Hold until the Elevator Arrives
- Descend Deeper into the Ruins
- Advance to Aurora
- Defeat the Helbrute
- Get to the Surface
- Seek Out the 2nd Company Position
- Regroup with Acheran
- Follow Acheran
- Advance to the Second Force
- Raise the Banner
- Defend the Banner
- Follow Calgar
- Advance to the Obelisk
- Defeat the Helbrute
- Advance to the Obelisk
- Find Lord Calgar
- Defeat Imurah
- Fight your Way to the Energy Stream
We have created a detailed guide for each objective and combat tactic to help you through the Dawn’s Descent Campaign Mission in Warhammer 40k: Space Marine 2.
Converse with the Chaplain
")
Your first goal in the Dawn’s Descent Campaign Mission is to meet the Chaplain. Proceed towards the yellow assembly point and interact with the control unit to activate the elevator.
Follow the yellow marker to reach the Chaplain. Upon arrival, he discusses the events involving Imurah and cautions the squad about his watchful presence.
Proceed to the Launch Bay
")
After your conversation with the Chaplain, head towards the Launch Bay. Follow the yellow marker to the elevator, which will transport you there. Once you arrive, interact with the control unit to reach the bay.
Once at the bay, continue following the yellow marker until you locate the Thunderhawk Gunship. Titus briefs the team before they embark to Demerium.
Board the Thunderhawk Gunship
")
Your next goal involves boarding the Thunderhawk Gunship to advance in the Dawn’s Descent Campaign Mission.
Inside the ship, you’ll find the mission objectives:
- Perform the Sub-Orbital Drop to Demerium’s Surface
- Stop the Activation of Project Aurora
Titus reminds the team to stay coordinated and cautious before they jump. After the jump, navigate through the debris to land safely, avoiding oncoming ships and wreckage.
Utilize the left and right controls to maneuver your way until you are transported via the Warp beacon. Subsequently, a cutscene depicts your safe arrival at Demerium.
Fight your Way to the Enemy Vessel
")
Upon landing, your next objective is to fight towards the Enemy Vessel directly ahead. Clear out all opposing heretics using your weapons blessed by the Imperium. Utilize your Jump Pack’s abilities wisely as you progress.
Be cautious of lurking heretics ready to ambush you from above; eliminate them before continuing below to ensure your flank is secure. Proceed until you reach a large hole in a building. Jump down into it to continue the Dawn’s Descent Campaign Mission.
Inside, you will discover ammunition boxes and Medicae stims; replenish your resources before moving forward. Once prepared, head to the yellow marker to interact with the control unit and open the door, leading you to an active battle area.
Defeat all heretics and clear the area to progress. Among them, locate and eliminate a sorcerer to diminish their numbers.
Clear the Passage
")
Once victorious over the heretics, your next task is to clear the passage as part of the Dawn’s Descent Campaign Mission. Follow the yellow marker to engage with the Chaos Altar and destroy it.
Advance to the Cathedral
")
Your subsequent objective is to advance towards the Cathedral. Use the floating blocks as stepping stones and utilize your Jump Packs to traverse across gaps and continue your journey.
Advance until you reach a wall with priest statues. Utilize your Jump Pack to leap over it and proceed to the other side.
Once across, continue towards the yellow marker to place the beacon for the targeting signal.
Hold Until the Battle Barge Has Target Lock
")
Your next objective requires you to hold your position until the Battle Barge locks onto the beacon’s signal.
Expect ambushes from waves of heretics you must dispatch before advancing. Activate your Jump Packs to execute Ground Pound attacks to stun and eliminate stronger foes, maintaining your position until the Barge has a clear signal.
A cutscene follows showcasing the Sword of Atreus slicing through the heretic’s power source to obliterate it.
Advance to the Mechanicus Facility
")
Your next task involves advancing to the Mechanicus Facility that houses Aurora. As you progress, Imurah projects his image to taunt you — don’t get distracted and keep moving forward.
Navigate through the path, dispatching all heretics in sight. Jump down to a lower level, continue onward, and interact with the Chaos Altar to destroy it and open a cursed gate.
Be relentless in eliminating heretics and cultists as you approach the camp. Once at the camp, utilize the available ammo crates and weapons to replenish your gear.
Investigate the Dig Site
")
Next, you are required to investigate the Dig Site. Advance deep into the site and clear any obstacles by interacting with the yellow marker to remove the pipe blocking your path.
A fresh ambush of heretics awaits you, and you must vanquish them in the name of the Imperium. After overcoming them, continue into the narrow tunnel rich with heretic energy. Reach the bunker and advance through the lighted path in the chamber. Interact with the control unit to begin decontamination, then wait until it’s completed.
Once clearing finishes, proceed through the now-unlocked gate and continue down the path until you arrive at another lower level area.
Explore the Ruins
")
Your task is to explore the ruins next. Proceed to the yellow marker and interact with it to clear the obstructing debris.
Descend further until you discover a stronghold of heretics; eradicate all in your path. Once cleared, continue to follow the yellow marker, combating more heretics as you venture deeper.
You will come across numerous ammo boxes and Medicae stims advised to resupply before you advance. Shortly, another group of heretics will attack; eliminate them and maintain your progression through the Dawn’s Descent Campaign Mission.
Proceed through the vicinity of the approaching heretics, heading towards a large entrance surrounded by cursed energy. Jump down to the lower level; there, continue battling against heretics until you can interact with the yellow marker to destroy the Chaos Altar and open the next gate.
Venture through the right gate to enter the subsequent section. A phantom of Imurah will appear to taunt you, but keep pushing forward until reaching the large circular hall.
Follow the yellow marker to the assembly point and await your squad’s arrival. Interact with the control unit at the elevator to ascend to the next level of the mission.
Hold until the Elevator Arrives
")
In this section, hold your ground as you await the arrival of the elevator. Eliminate all visible heretics and traitors that attempt to breach your position.
Eventually, the elevator will arrive, bringing additional heretics for you to dispatch. Clear these threats to advance further in the Dawn’s Descent Campaign Mission.
Descend Deeper into the Ruins
")
After defeating the latest wave of heretics, follow the yellow marker to the assembly point and wait for your squad. Interact with the control unit at the elevator to descend deeper into the ruins.
Advance to Aurora
")
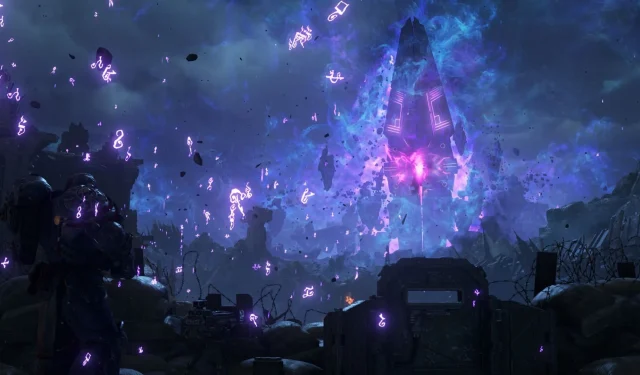
Your subsequent objective is to head toward the large Obelisk at the center known as Aurora. As you progress, eliminate any heretics obstructing your path.
Continue forward through the long corridor leading towards Aurora. Once you enter a cave, dispatch any minions in the area until you reach the yellow marker. Interact with it to remove the debris blocking your path.
As you progress, repel hordes of heretics while advancing towards the Obelisk. An epic cutscene showcases your engagement with Morias Leuze, who declines your request to shut down Aurora and instead insists on exploiting its corrupt power. Shortly after, Imurah appears to further complicate matters.
Defeat the Helbrute
")
Your next mission is to defeat the Helbrute, one of the most formidable enemies in Warhammer 40k: Space Marine 2. Engage it carefully; avoid its lunging attacks as they can inflict significant damage.
Utilize a combination of rapid-firing and high-damage weapons, while incorporating Titus’ Righteous Fury ability for added offensive power. Continue dishing out damage until you bring the beast down, frustrating Imurah in the process.
A cutscene unfolds where Leuze activates the machine, amplifying a massive energy pulse that seemingly obliterates Imurah. However, while Leuze revels in his glory, Imurah corrupts the machine, taking control of Aurora, and eliminates Leuze with a devastating shot, warning Titus that doom is imminent.
Get to the Surface
")
Your objective now shifts to ascending to the surface to assist allied forces. Make your way to the yellow marker and interact with the control unit to unlock the door leading to the next stage.
Seek Out the 2nd Company Position
")
Your next task is to locate the 2nd Company‘s position and regroup with them. Navigate past corrupted Cadians and head forward.
Reach the large door marked with an X and proceed through to enter the next section of the Dawn’s Descent Campaign Mission. Drop down the hole and continue onward, following the yellow marker to the assembly point while waiting for your squad.
Regroup with Acheran
")
Interact with the yellow marker to engage the control unit and meet with Captain Acheran. Step outside and clear out all the heretics before advancing to the next phase of the Dawn’s Descent Campaign Mission.
Engage with the yellow marker to remove debris obstructing your way and follow the right path down through lower levels toward Captain Acheran‘s location.
Here, you’ll face off against a horde of heretics and minions; eliminate them before continuing your mission. After securing the area, head towards your fellow marines as they clear the way for you to meet with Acheran. Interact with him to gather intel and devise a strategy to counter the warp rift threat.
Follow Acheran
")
Your next objective is to follow Acheran to the gateway. Walk past the praying soldiers and proceed closely behind him.
He outlines the assault strategy and instructs Titus to recover the company standard from a fallen colleague. Ensure you grab ammo, caches, and Medicae stims from your surroundings before moving to the next task in Dawn’s Descent Campaign Mission.
Once ready, interact with the yellow marker to open the door, leading into an active battle area where a Heldrake will engage you. Clear all the ambushes and continue your relentless push forward, maintaining proximity with Captain Acheran.
Reach the yellow assembly point and interact with the control unit to progress to the next phase of the mission.
Advance to the Second Force
")
Make your way to the Second Force as your next goal within the Dawn’s Descent Campaign Mission. Proceed down the stairs to lower levels before heading towards the force.
At the yellow assembly point, interact with the control unit to open the next door. Prepare for an ambush from heretics and a sorcerer; eliminate them to move ahead.
Upon victory, venture deeper past the tombs toward the yellow assembly point, where another control unit awaits. Interact with it to proceed to the following section of the campaign.
As you arrive in an open area, consolidate with your fellow marines—Titus observes the Marines Standard lying on the ground and rallies his squad to raise the banner.
Raise the Banner
")
Your following goal in the Dawn’s Descent Campaign Mission is to raise the Banner. Interact with the yellow marker to hold it high and continue advancing.
Defend the Banner
")
In the next phase of the Dawn’s Descent Campaign Mission, you will defend the banner against an assault of heretics and minions.
Maintain your grip on the banner as you continually eliminate all incoming heretics with your one-handed weapon. A cutscene will showcase the marines clearing out the onrushing horde of heretics. Just as the marines seem overwhelmed, Lord Calgar intervenes, obliterating the remaining threats.
The cutscene continues with an exchange between Lord Calgar and Gadriel, where they discuss inverting the device to disrupt the Obelisk and halt heretic tyranny.
Follow Calgar
")
Your mission is now to follow Lord Calgar. Move forward alongside the Ultramarines up to the forcefield.
A cutscene reveals Gadriel interrupting and flipping the device, causing it to emit a green beam that weakens the Daemon. The Ultramarines then proceed to interact with various devices to seal the infernal gates.
Advance to the Obelisk
")
Your next task is to progress to the Obelisk. You’ll find yourself in a room stocked with ammo and Medicae; ensure to load up before proceeding.
Head to the yellow assembly point and interact with the control unit to open the door, moving onwards while dispatching all layers of heretics along your path.
After heading towards the last Obelisk, finding the bridge collapsed will require you to explore alternate routes to reach your goal. Divert left and clear your path by interacting with the obstruction.
Progress along the yellow assembly point and destroy the Chaos Altar to access the locked gate. Develop forward, keeping up your assault on heretics obstructing your direction. Just as it seems clear, a Helbrute ambushes you.
Defeat the Helbrute
")
Engage in combat with the Helbrute, using similar tactics from previous encounters: avoid its attacks while delivering consistent strikes to overpower it.
Once it falls, Decimus will notify you that he has inverted the second Obelisk, progressively weakening the Daemon.
Advance to the Obelisk
")
To continue the mission, advance to the Obelisk. Interaction at the yellow marker will clear additional Chaos Altars, unlocking your route further ahead.
As you progress, discover a Dreadnought battling a Helbrute. Invite it to join you, unleash its fury on the onslaught, and continue fighting the numerous heretics leading towards the Obelisk.
Follow the markers until you reach your destination, triggering a cutscene where Chairon interacts with the Obelisk, further weakening the Daemon with an inverted beam. Lord Calgar then requests aid from you and your squad to eliminate the heretic forces.
An intense action sequence plays out, where Imurah attempts to uncover a rift for his escape. Lord Calgar contests this, leading Dr. Titus and his squad into the rift following him.
Find Lord Calgar
")
Upon crossing the rift, you must now locate Lord Calgar. Move carefully forward in search of the Chapter Master.
As you journey, ensure you gather weapons and ammo for the challenges to come. Push forward until a cutscene ensues, showcasing the squad confronting Imurah, who has captured Calgar.
Defeat Imurah
")
Your objective now transitions to vanquishing Imurah, a key antagonist within the game. Engage with caution; avoid his powerful attacks as they can cripple you.
Employ ranged attacks effectively and toss grenades to weaken him. Although you might be incapacitated periodically, recover quickly and continue your onslaught in the shadows.
When the large beast appears, aim for its eyes to inflict the most damage possible. Once sufficiently weakened, a vision will ensue, and you must break free from it in time to join Calgar in proving your worth.
Fight your Way to the Energy Stream
")
In this penultimate segment of the Dawn’s Descent Campaign Mission, push onwards towards the visible Energy Stream. Engage closely with Imurah, maintaining damage against him, while assisting Lord Calgar and your allies in the fight.
A final cutscene reveals Titus bravely standing strong against Imurah‘s power, ultimately gaining dominion over the artifact, reversing its energies to obliterate the heretic.
As Titus lies on the ground, Lord Calgar encourages him to rise, emphasizing his duty is far from finished. Upon recovery, your squad cheers, marking the victorious conclusion of the Dawn’s Descent Campaign Mission in Warhammer 40k: Space Marine 2.
In the subsequent cutscene, Titus is honored with the Laurels of Victory, and Lord Calgar invites him to participate in a new mission. Titus bids farewell to Chairon and Gadriel before joining Captain Acheran to board the ship.
Related Articles:

Warhammer 40,000: Space Marine 2 Developer Highlights Intentional Xbox 360 Nostalgia Element
6:04
Warhammer 40,000: Space Marine 2 Update Introduces Ultrawide Support for PC, Private Operations Lobbies, and Additional Features
20:20
Warhammer 40,000: Space Marine 2 Weapons Upgrade Guide – Top Choices for Early Enhancements
13:30
Leave a Reply